Easy Smart Phone Photography Tips for Kayakers
9-minute read
With the development of smart phone photography in the last decade or so, it’s easy for anyone to learn to take great photos while you’re kayaking, packrafting, canoeing or paddle boarding.

Lovely reflection of the trees and sky on the calm water (despite the over-exposed white paddle blade!)
Capturing those memories is fun and rewarding, especially as you learn to get the most out of your phone’s camera.
Anyone can learn basic principles to develop that “eye” for good photography. And with a few gear items to consider that are, thankfully, very reasonably priced, you can get on the water without the fear of losing or damaging your phone.
Basic Photography Principles You Can Learn
These basic principles apply no matter which smart phone you have:
GET TO KNOW YOUR PHONE’S OPTIONS for photography before you head out on the water. Practice taking all kinds of photos around your home so you’re comfortable switching your settings quickly.
THINK BOTH VERTICAL AND HORIZONTAL when you compose your shots. What do you want in the frame? Which format works best to get it all in?
YOUR PHONE HAS PHOTO SETTINGS for dimensions and resolution. Higher resolution means higher quality, but also bigger files and therefore more space. Experiment with different sizes and quality to see the final result. Photos you’ll only view on your phone can be much lower quality than photos you’ll print or enlarge.
LOOK FOR A FOCAL POINT. What’s the first thing your eye is drawn to in the composition? That’s the focal point. Maybe it’s your friend in the other kayak, or an interesting item on the shoreline. You want your focal point to be intentional.
USE THE “RULE OF THIRDS” as a starting point when you compose your photos. This basic design principle places the focal point of the photo off-center rather than dead-center. Though it seems counter-intuitive, the result is a photo that’s better balanced and more pleasing to the eye.

Your phone may have a grid option like this you can turn on to use the Rule of Thirds
Your phone’s camera likely has an option to turn on a grid that divides your screen into thirds. You can use that to aid you to think in thirds until it comes naturally.
Sometimes you’ll get the best photo by breaking this rule, but it’s always a great place to start.
LEARN TO USE LIGHT STRATEGICALLY. Being outdoors, the sun is the main source of light. Be aware of the sun’s location and angle. Look for shadows. There’s a lot you can learn and use to your advantage with lighting. A great resource is “Seeing the Light in Outdoor Photography” by Colleen J. Miniuk. This PDF ebook is just $9.95.
LOOK FOR LARGE-SCALE AND SMALL-SCALE subjects to photograph. There will be a thousand options while you’re in your kayak, whether you’re in nature or in an urban setting. Keep a lookout for anything you find interesting. It could be a color-laden sunset (large-scale) or it could be water droplets on a lily pad (small-scale).

A great example of things you can only see from the water, when you keep your eyes open—this fawn drinking along the shoreline. The aquatic plants in the foreground and the fawn’s reflection add interest.
USE THE WATER and its unique photo opportunities. If the water you’re paddling is clear, there are photo opportunities under the surface. Position yourself so the sun’s glare doesn’t block you from looking into it. If your phone is waterproof or in a waterproof case (more on that to come), even try taking underwater shots.
The other unique opportunity when you’re on water is reflection, especially on a calm day. Look for shots that include a reflection of the shoreline, the sky or other kayakers.
TAKE LOTS OF PHOTOS so you have lots to choose from. Pick the best from each kayak trip and toss the rest so they don’t eat up space on your phone.
Take Advantage of Your Phone’s Photo Options
Your phone’s photo app has several settings you can experiment with. You don’t have to use them all, but try them to see what they do. Practice using the options you like and they become tools you can pull out when you want them.
The panorama setting is a good example. It’s super for wide-angle landscapes to give a sense of vastness. But it takes a while to get the gist of using it so your final photo is straight and in-focus.
Portrait is another good example. It may take several shots to get the right part of the image in focus, especially if there’s any wind. When it works, though, it can be stunning.
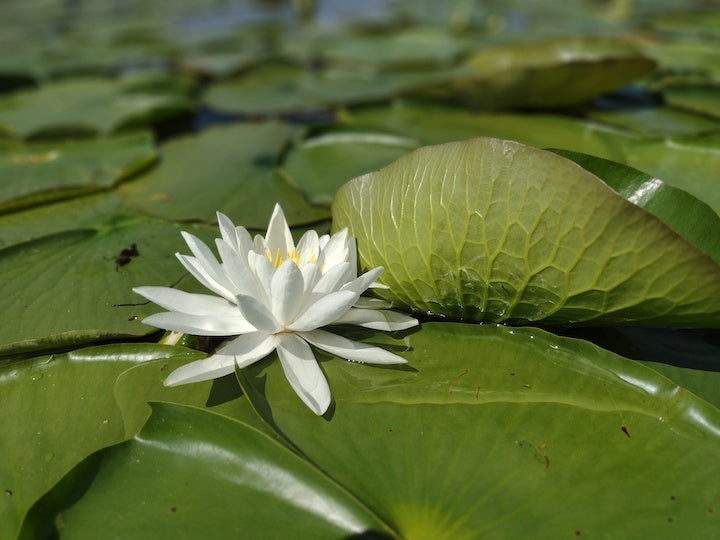
This photo of a water lily was taken from a kayak with a mid-range Motorola phone, through a waterproof phone pouch using the portrait setting.
PAY ATTENTION TO THE HORIZON. When you’re on the water, especially a big lake or the ocean, there will be a long horizon in your photo. Your camera may have the option to show you a horizon line so you can be sure it’s straight. You can always straighten it later in post-production, but then you’ll lose some of the photo.
THE SUN MAKES YOUR SCREEN HARD TO SEE, especially if you’re wearing sunglasses. Make adjustments and take several shots at different angles to be sure you end up with one you like.
DON’T FORGET ABOUT VIDEO. Short clips of video are fun, too, and make a fun companion to the still photos. There are free video apps like iMovie (Apple) or PowerDirector (Android) you can use to edit them later by putting several clips together, or by adding text and music if you want to.
LEARN TO USE PHOTO EDITING TOOLS to crop, add filters, correct poor color, lighten shadows and other ways to improve your final images. You can do this right in your phone or transfer your photos to a tablet, laptop or desktop computer.
Cropping is especially an easy and quick way to highlight a focal point or turn a so-so photo into one that captures your attention. It’s also handy for taking out unwanted parts of the image.

This vertical photo has too much sky…

…but it can be cropped to a horizontal photo instead, which also brings the subject closer.
This article by our friends at FeelFree Kayaks offers these additional tips:
- Set your camera app on “time lapse” and press record for a few seconds.Choose the best of the shots to keep for a still photo.
- Use the self-timer to give yourself time to position yourself perfectly. This is especially helpful if you’re kayak fishing and are getting a photo with your latest catch.
Challenges of Photographing in a Kayak
There are some challenges with photographing on the water, whether with your phone or a camera:
YOU’RE ALWAYS MOVING. Unless there’s not a breath of wind, you’ll drift. It can be tricky to position yourself and stay in position to get the shot you want. Patience is your best ally here, as well as being handy with your paddle strokes.
KEEPING THINGS DRY is a challenge—not just your phone, but your hands.
NEVER SACRIFICE SAFETY for “the perfect photo.”
- Don’t get out on water or in conditions above your skill level.
- Pay attention to your surroundings while you’re taking pictures.
- If you’re on a paddle board you may want to kneel rather than stand for better stability to get that perfect shot. (You know your own skill level on a SUP.)
- Keep your life jacket on.
- Have a secure spot to place your paddle so it doesn’t fall overboard while you’re taking pictures.

Don’t forget to look under the water’s surface for photo opportunities
Basic Phone Photography Gear Options
There are a few inexpensive gear items you can buy to aid you in your kayaking photography.
Of course the most important item is your phone’s camera itself. Start with the one you already have and learn how to use it. As we already mentioned, get used to the various settings so you’re comfortable with them. Know what’s possible.
When it comes time to upgrade your phone, do some research to find one in your budget that has the best photo and video capabilities.
WATERPROOF PHONE POUCH. Most phones these days are water resistant, but that’s not the same as waterproof. If your phone isn’t 100% waterproof, a clear waterproof phone pouch is the way to go. Not only does it protect your phone from splash and your wet fingers, it keeps your phone around your neck with a lanyard so it’s always accessible and secure. You can use your touch screen and controls right through the pouch.
Do an online search for recent reviews, as there are always new brands and styles on the market. Pay attention to the size to be sure your phone fits. Look for positive customer reviews. There are models that float, which is a big plus for paddlers!
These don’t work great for selfies when they’re around your neck. But take it off and you can still wrap the lanyard around your wrist when you hold it out over the water. The last thing you want is to drop your phone in the lake!
WRIST STRAP. If your phone is 100% waterproof you won’t need the pouch, but you’ll still want some kind of wrist strap to prevent it from falling in if it happens to slip out of your fingers. $12.99 is a tiny investment to save your $1,000 phone!
PHONE MOUNT. If you want to get more serious about kayak photography, consider investing in a phone mount with an extension so you can keep it ready to go on your kayak itself. This works great for photos, for selfies and to capture your location (with still photos or video) while you paddle. (The FeelFree article we mentioned goes into more detail about mounts.)

The deep shadow in the rocks makes the yellow kayak really pop as a focal point (photo courtesy of Kirsten Voorhees)
We have astounding pocket-size technology that’s, literally, right at our fingertips for taking truly beautiful photos. Learn to use that technology well and you’ll have plenty of photos to look back on and relive those memories.
All photos courtesy of Sharon Brodin except where noted. All the photos were taken with a cell phone camera.
Do you have paddle questions our friendly Customer Service Team can help you with today? Contact them: 715-755-3405 • sales@aquabound.com
More for you...

